
A FINISH DURABLE ENOUGH FOR A WOODEN COUNTERTOP
Wooden countertops need a finish that can handle water, heat, and daily wear—without hiding their natural charm. This guide shows why General Finishes Arm-R-Seal is the perfect choice, plus exactly how to apply it for a smooth, durable, and easy-to-maintain surface.
In this article, I’m tackling one of the most common questions viewers ask: How do you choose and apply a durable finish for wooden countertops?
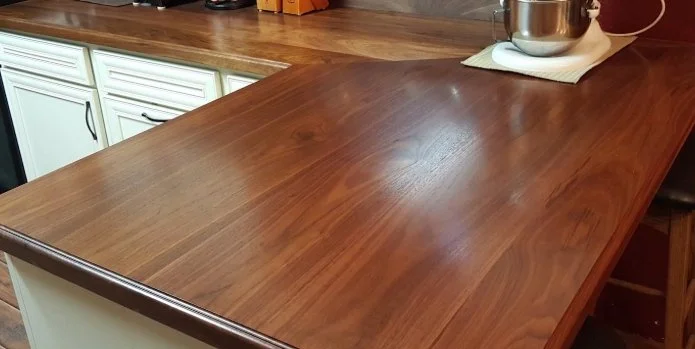
Since countertops take a lot of abuse, you need something that can stand up to water, heat, and grease. Notice I didn’t say the finish should protect against dents or dings—because this isn’t granite. Wood is a different material with its own natural charm, and it deserves different expectations.
Dents and blemishes are part of the character of wood. Just like your dining table or hardwood floors, your counters will age. Personally, I think those little imperfections look far better than a plasticky epoxy shell slathered on top.
My Finish of Choice: General Finishes Arm-R-Seal
My go-to finish is General Finishes Arm-R-Seal—and no, this isn’t a sponsored post. It’s a urethane-based topcoat made from high-quality resins, and it’s considered a fine furniture finish rather than the cheap stuff you find at the hardware store.
Arm-R-Seal penetrates into the wood, hardening and sealing the outer fibers, while producing a smooth, attractive surface.
Now, let’s be clear: this won’t make your counters waterproof. But it will make them water-resistant, which is really what you need for normal kitchen use. Just wipe up spills like a reasonable person instead of letting puddles of Kool-Aid dry overnight.
Application Is Easy
The best thing about Arm-R-Seal? It’s easy to apply.
Use a lint-free cloth—I like to fold up a piece of T-shirt material into a pad.
Apply it liberally, especially on the first coat, which will soak deep into the grain.
Wipe away the excess and work with the grain. On the first coat, that’s less critical, but it’s still a good habit.
Avoid going back over areas you’ve already covered—it dries fast!
Safety & Ventilation
It’s up to you whether to wear a respirator. I wouldn’t want to inhale it all day, but it’s not as noxious as some other finishes. At the very least, ventilate the area while you work.
Recoating Tips
The manufacturer recommends waiting 12–24 hours between coats. In my experience, I’ve had success applying a second coat after 3–4 hours, depending on weather and thickness. But never recoat if the surface still feels tacky or cool to the touch.
Pro tip: Press a cotton ball against the surface. If it doesn’t stick, you’re probably good to go.
Before each new coat:
Lightly hand-sand with 400 grit sandpaper—just enough to smooth it out.
Remove the dust with compressed air or a vacuum.
Wipe clean with water or mineral spirits.
Applying Additional Coats
Second coat: Won’t absorb like the first, so apply it thinner.
Third coat: Same process—dry, sand, wipe—but be extra careful to avoid streaking.
Especially with satin finishes, stir frequently to keep the flattening agents suspended.
Important:
Don’t over-wipe. If you see a streak after covering an area, leave it. It will likely disappear as it dries.
The Final Coat
After the third coat dries:
Lightly sand with 600 grit.
Apply the thinnest possible coat—often, the residue left in your cloth is enough.
This thin layer will dry quickly and reduce the chance of dust particles settling into the finish.
How Many Coats?
Three regular coats and one super-thin final coat is all you need.
More than that won’t increase durability—ten coats won’t outperform three.
I like to finish by buffing with a brown paper bag, which is about the equivalent of 1500 grit sandpaper.
Then let it cure for 30 days.
Aftercare & Maintenance
Avoid using the countertops for the first week, if possible.
Don’t place heavy items—especially anything plastic—on them during the cure time. They may stick to the finish.
All countertop materials require maintenance, and wood is no exception:
Keep them clean.
Wipe up spills immediately.
Use a cutting board—don’t cut directly on the surface.
Expect a few nicks and dents.
If a blemish seems to have penetrated the finish, dab on a little more Arm-R-Seal to seal it.
After a few years, if the surface looks worn, sand lightly with 220 grit and apply a couple of fresh, thin coats.
With just a little care, your wooden countertops will outlast you.
This post may contain affiliate links. If you make a purchase, we may receive a small commission.
Need some cool tools for your shop? Browse my Amazon Storefront for inspiration.