
VENEERING BASICS FOR THE WEEKEND WOODWORKER
Veneering isn’t just for pros—it’s an approachable, game-changing technique that can elevate even small woodworking projects. From contact cement to vacuum pressing, this guide breaks down three practical methods to help you achieve clean, stable, professional-looking panels.
A while back, we made a solid wood exterior door—and there were a lot of little lessons learned along the way. I’ve already shared about the loose tenon joinery we used, so today I want to talk about veneering.
This is a skill that I think too many woodworkers dismiss out of hand as either too difficult or too expensive for a weekend workshop. In reality, there are times when every woodworker could benefit from some basic veneering knowledge. It opens up a world of possibilities for future projects.
Why Veneering Matters
That door is a perfect example. Even though it's a solid ash door inside and out, it couldn't have been made without some basic veneering techniques. The inner core was cut into strips and re-glued to disrupt the grain and improve stability. Then, thick veneers were applied to the exterior surfaces to give it the look of solid slabs, rather than a butcher block.

The inner core of the door was cut into strips and reglued to disrupt the grain and improve stability.
Cutting your own veneers isn't difficult—there are plenty of tutorials out there explaining how to do it with a bandsaw or even a table saw. What I want to focus on is the part that intimidates many woodworkers: applying even clamping pressure so the veneer adheres properly to your substrate panel.
There are several methods, but we’ll cover three of the most accessible techniques for a small workshop.
Method 1: The Clampless Approach (Contact Cement)
The first method uses contact cement, applied evenly with a roller to both surfaces. Keep in mind that water-based contact cement may cause your veneer to curl more than solvent-based cement, which can make the process trickier.
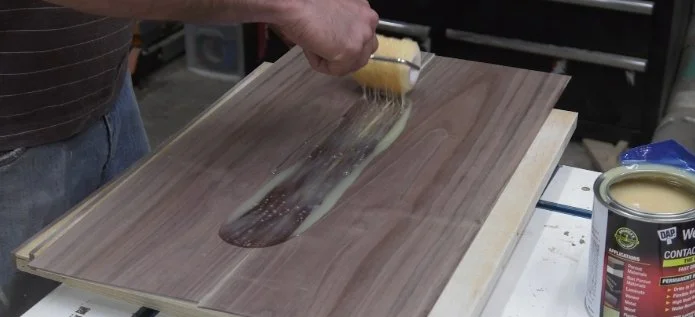
Once both surfaces are tacky to the touch, you can bring them together. In this case, we used oversized veneer, so precise alignment wasn’t critical. For larger pieces, you might want to use dowels to help with positioning—just pull them out one at a time, much like when installing countertop laminate.
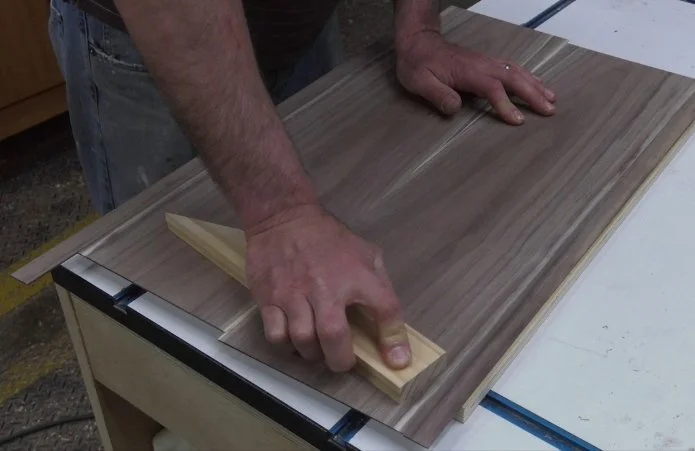
While contact cement doesn’t require clamps, it does require pressure. A block of wood or a roller works well to press the veneer down firmly. Once it’s secure, trim the edges and you’re done.
This method is fast and easy, but keep in mind the fumes can be harmful. Plus, contact cement isn't always the best adhesive for all veneer types, so do a bit of research before choosing this option.
Method 2: Wood Glue and Platens
The second method uses regular yellow wood glue, which doesn’t produce harmful fumes. However, because it’s water-based, it can cause your veneers to curl. That’s why even, consistent pressure is essential.
This is where platens come in—these are just scraps of thick, flat material used to help distribute clamping pressure evenly across your panel. Melamine is an excellent platen material since glue won’t stick to it.
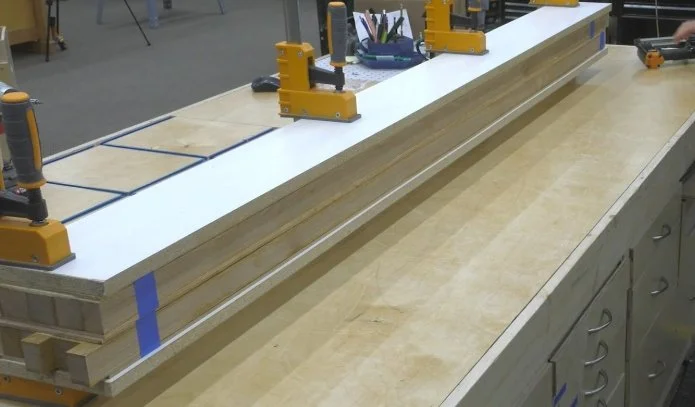
You’ll need plenty of clamps, but the platens will help even out the pressure, especially across wider panels where your clamps can't reach. That said, if your panel is too wide, platens and clamps may not apply enough pressure to the center.
Method 3: Vacuum Press
That brings us to the third method: vacuum pressing. This is actually my favorite, even for small projects, because it’s so easy and effective.
We use a relatively inexpensive vacuum bag system designed for people who make skateboards. I love it because you can remove the air with a simple hand pump—no pricey electric pump required. The special valve auto-seals when you stop pumping. (This isn’t a sponsored product—I bought it myself—but it works really well.)
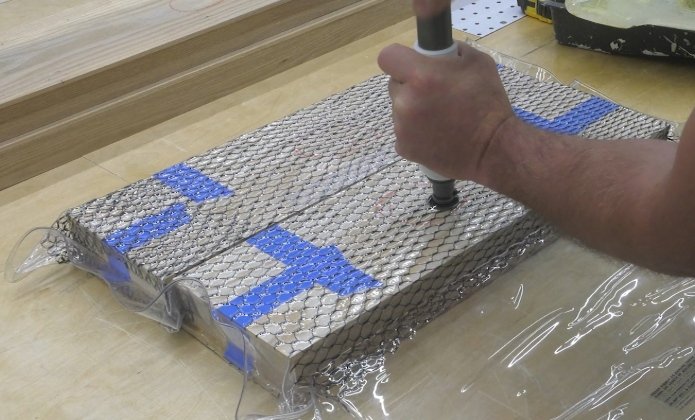
If it’s in your budget, I highly recommend picking one up. You’ll find plenty of uses for it down the road.
Wondering what the black mesh is for? It creates paths for the air to escape so you don’t get pockets in the bag that prevent even pressure. You don’t need to wrap your entire project in mesh—we just happened to have some big pieces lying around.
Final Thoughts
While we could make a lengthy tutorial diving into all the finer points of veneering, I wanted to keep things simple in this post. Veneering doesn’t have to be complicated or intimidating—especially for smaller panels. As you saw here, it can be very approachable.
Try it sometime—maybe start with a small box or cabinet project. You might just unlock a whole new world of possibilities in your woodworking journey.
This post may contain affiliate links. If you make a purchase, we may receive a small commission.
Need some cool tools for your shop? Browse my Amazon Storefront for inspiration.