
FIGURE-8 TABLE TOP BRACKETS THE RIGHT WAY
Learn how to correctly install figure-8 fasteners for table tops, prevent cracking from wood movement, and explore reliable alternatives like Z-clips and wooden brackets.
If you show this image to a group of veteran woodworkers, you’re bound to start a debate. Some will insist those little metal brackets are installed incorrectly and that the top will tear itself apart over time. Others will swear they’ve installed them the same way for years—and their granddaddy did too—and the table still holds up.
Internet forums, magazines, and even reputable woodworking sources often give conflicting advice on installing figure-8 fasteners. Following the wrong guidance can lead to cracked or split table tops. In this article, we’ll cut through the confusion: I’ll explain how figure-8 fasteners should be installed, why, and share some alternatives for attaching your next table top.
Why You Need Table Top Fasteners
Why not just glue or screw a top directly to the aprons? The answer is wood movement. Wood swells in humid conditions and contracts in dry ones. Table top fasteners allow the top to move independently of the base without cracking.
A few key points:
Wood does not grow longer, only wider and thicker.
Fasteners must accommodate movement across the grain, not along it.
Failing to account for this movement can compromise your table’s longevity.
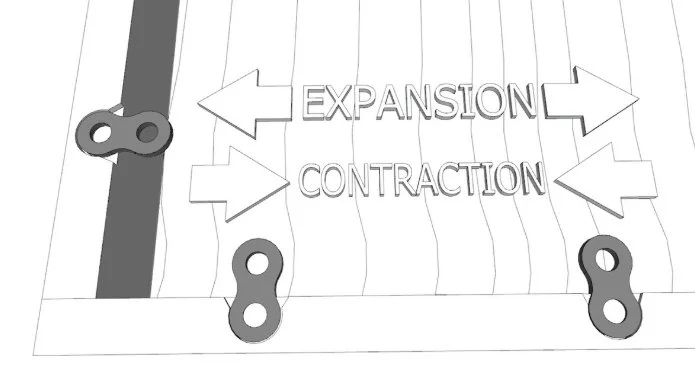
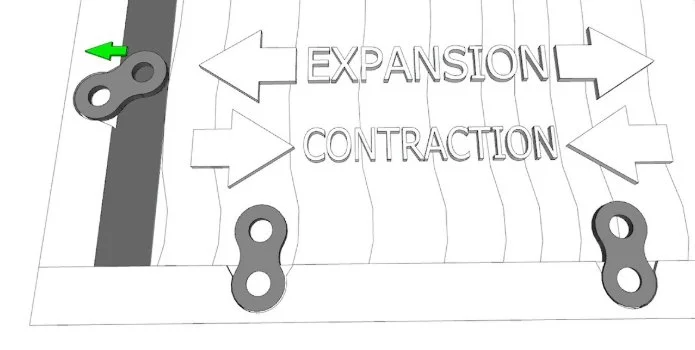
How Figure-8 Fasteners Work
Figure-8 fasteners are designed to pivot:
As the top swells, the screw and fastener can move, allowing expansion.
As the top shrinks, the fastener pivots the other way to allow contraction.
Proper installation is critical. Take the following rectangular end table as an example, where the grain runs front to back:
Front and rear aprons (grain perpendicular to the fastener): The brackets work as intended, pivoting side to side with lateral wood movement.
Side aprons (grain parallel to the fastener): Installed straight, the bracket cannot pivot with shrinking wood, so the top may pull against the fastener.
The solution? On aprons parallel to the grain, slightly cant the bracket. This orientation allows it to pivot both ways, accommodating expansion and contraction.
Installation Tips

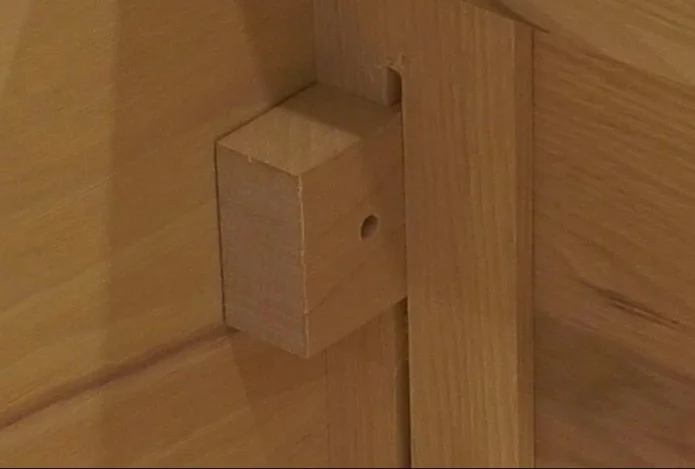
Mortise the apron properly: Use a Forstner bit to bore a shallow hole near the edge, then chisel the corners so the bracket sits flush and can move freely.Ensure the fastener can rotate fully—any obstruction will prevent proper movement.
Alternatives to Figure-8 Fasteners
Simple to install.
Cut slots in the apron with a biscuit joiner, table saw, or router.
Clips slip into the slots and the top tabs are screwed to the underside.
Allow side-to-side movement for aprons perpendicular to the grain. For parallel aprons, leave a slight gap between the bracket and apron to avoid binding.
Wooden Brackets
Fit into slots in the apron similar to Z-brackets.
Mounting holes should be oversized for aprons parallel to the grain. This allows the screw shaft to move as the top swells.
Pocket Screws (Shaker Style)
Counterbore the pocket so the hole is slightly larger than the screw shaft.
This allows for wood movement while still securely attaching the top.
Final Thoughts
No matter which method you choose, take a few minutes to consider how your solid wood top will move. Properly installed fasteners or slots give your table top the freedom it needs to expand and contract—protecting your hard work for decades.
A small investment of time during installation can ensure your furniture outlasts you.
This post may contain affiliate links. If you make a purchase, we may receive a small commission.
Need some cool tools for your shop? Browse my Amazon Storefront for inspiration.