
THE COMMON MISUNDERSTANDING OF SAFE ROUTER FEED DIRECTION
Feeding a router the wrong way can ruin your cut—or worse, be dangerous. This guide explains push cuts vs. climb cuts, when to use each, and how feed direction changes between handheld routers and router tables.
Which way should you move a router across the edge of a workpiece—right to left, or left to right? Does it matter?
It does. Moving the router in the wrong direction produces what’s known as a climb cut. Climb cuts can be useful in some situations, but they can also be dangerous. Knowing when and how to make a climb cut (and when not to) is a confusing but important lesson for all woodworkers. The quality of your cut can depend greatly on your feed direction—and to make matters more confusing, the “rules” reverse depending on whether you’re using a handheld router or a router table.
This tutorial will sort it all out for you in a logical way, with examples and explanations so you can get the best, safest results possible.
Push Cut vs. Climb Cut
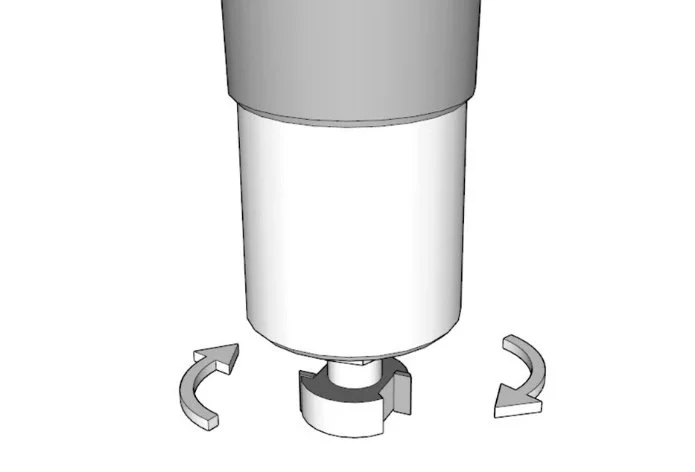
Think of the router bit as a small wheel. In a handheld router, the bit points downward, and from your perspective above the motor, it spins clockwise. If you place that bit against the edge of a workpiece, the cutters will dig in and naturally try to pull the router from right to left. If you let the bit go all the way around the perimeter of the workpiece, it would pull you in a clockwise direction.
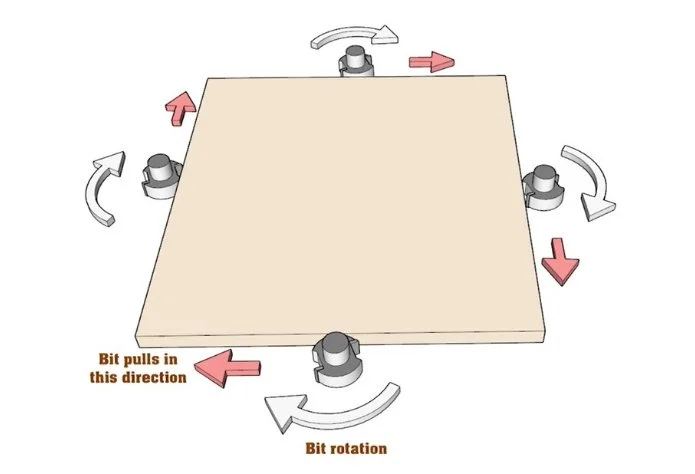
That natural pulling motion is called a climb cut.
If you want more control, you should push the router against its will—feeding it in the opposite direction it wants to climb. This is called a push cut. With a handheld router, this means moving the tool counterclockwise around the perimeter of a workpiece. You’ll find you have much more control with a push cut.
Edge-by-Edge Feed Directions
You don’t always rout all the way around a piece, so let’s look at each edge individually.
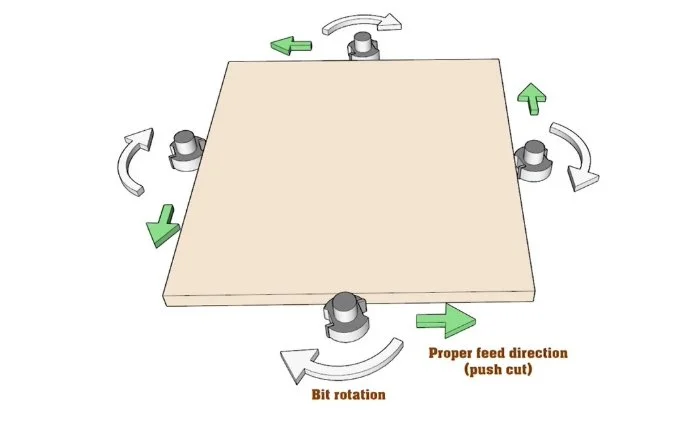
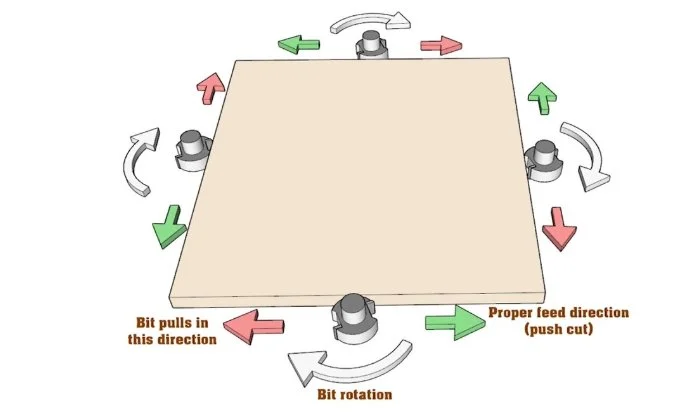
On the front edge of the workpiece, a push cut goes left to right.
On the back edge, a push cut goes right to left.
On the right edge, you push up.
On the left edge, you push down.
Now, if you’re routing the inside of a frame or cutout, all of those directions reverse. Instead of counterclockwise, you’ll move clockwise, because the other side of the bit is now doing the cutting.
The Rule of Thumb
Fortunately, there’s an easy way to remember the correct direction called “The Rule of Thumb”. Extend your right hand, palm down, with your thumb and index finger pointing out. Place your thumb along the edge you want to rout. Your index finger will point in the direction of a proper push cut with a handheld router.
That’s the direction you almost always want to move in.
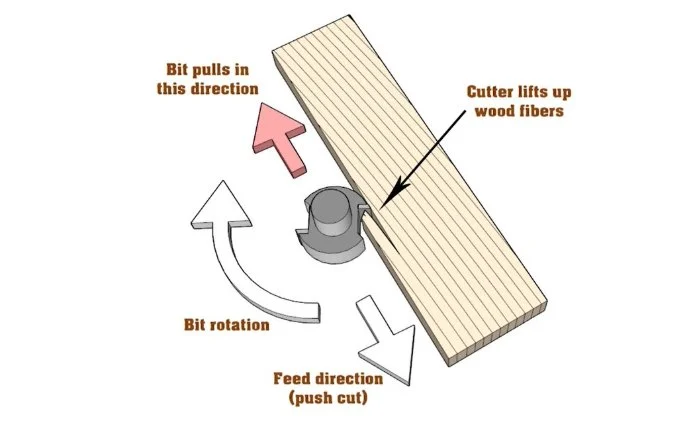
When to Use a Climb Cut
There are times when a climb cut is useful—even necessary. The most common reason is to prevent tear-out. Tear-out can occur when the wood grain slopes toward the edge against the rotation of the bit. In this case, the cutters lift the fibers, leaving a ragged edge. Reversing your feed direction into a climb cut allows the bit to press the fibers down instead of levering them up.
Tips for safe climb cutting:
Take light passes (two or three instead of one heavy cut).
Keep a firm grip on the router.
Consider making most of the cut with a push direction, then finish with a light climb pass to clean up the edge.
Climb cutting is especially handy when routing curves. Grain direction often changes at the apex, so you may need to switch mid-curve—using a push cut on one half and a climb cut on the other.
It can also help when routing shallow mortises or inlays, where a push cut tends to let the bit wander. A light climb cut can give you more control in those cases.
Router Tables: Everything Reverses
Everything we’ve discussed so far applies to handheld routers. On a router table, the bit is upside down, and the feed directions reverse.
More importantly, climb cutting on a router table is much more dangerous. With a handheld router, the motor may jerk, but you’re still holding the tool. On a table, the bit can grab the workpiece and pull your hands into the cutter. For that reason, climb cuts on a router table should be avoided.
Final Thoughts
As a rule of thumb:
Push cut whenever possible.
Climb cut only when necessary—and only with a handheld router.
Climb cutting has its place, but it should be used carefully and sparingly. Mastering feed direction will make your routing safer and your results cleaner.
Save this guide for future reference—router feed direction can be confusing, but once you understand it, you’ll have much better control over your cuts.
This post may contain affiliate links. If you make a purchase, we may receive a small commission.
Need some cool tools for your shop? Browse my Amazon Storefront for inspiration.