
HOW TO RIP CUT WITH A BAND SAW
Think band saws are just for curves? Think again—ripping rough or warped boards on a band saw is not only safer than using a table saw, but with the right blade, setup, and technique, you can get smooth, accurate cuts every time.
I own a really nice table saw. So why on earth would I use the band saw for ripping straight lines? Isn’t this just a curve-cutting machine?
Not at all. In fact, there are plenty of cases where it makes more sense to rip with a band saw than with a table saw. In this post, I’ll share when to use a band saw for that type of work, how to get the best results, what blade to use, and a few useful techniques I’ve learned over the years.
Let’s get started.
Why Rip on a Band Saw?
Sometimes rough lumber that’s warped, cupped, or poorly dried—like many 2x4s—can raise the risk of a nasty kickback on the table saw. That’s because the wood can shift or pinch against the spinning blade.
A band saw, however, works differently. Its blade is narrower and travels downward, pushing the wood toward the table instead of backward toward the operator. This means band saws don’t kick back like table saws do, making them much safer for cutting wood that isn’t perfectly straight or flat—or that might pinch the blade.
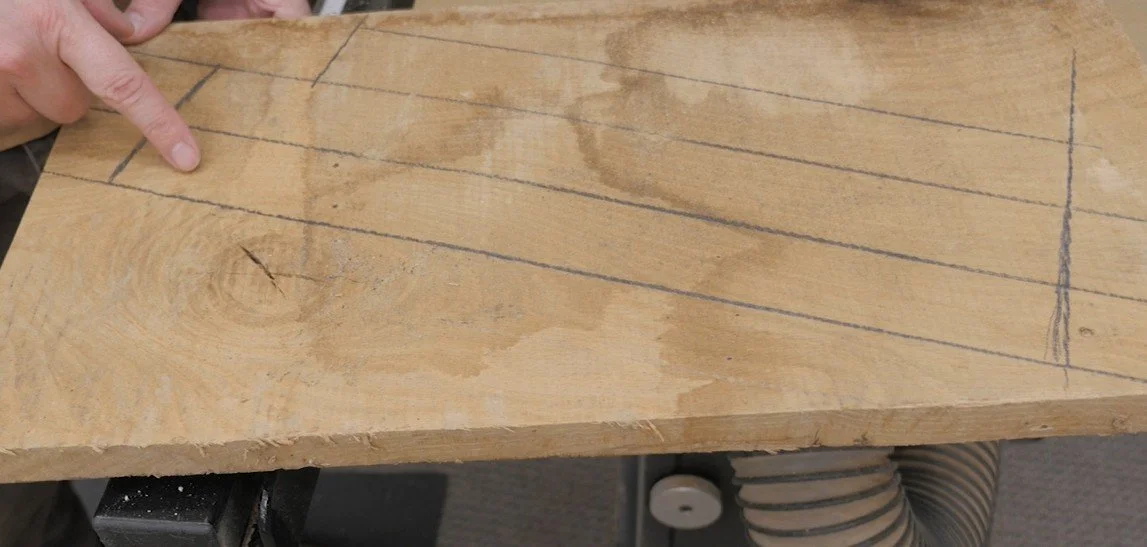
Another advantage: a band saw can cut lines that aren’t perfectly parallel to an edge. For example, you might want to position your project parts in the best-looking section of a board to avoid flaws or highlight straight grain. With a band saw, you can cut along an angled edge freehand, then joint it straight and have a perfect reference edge for later cuts.
Getting Quality Cuts
Rough ripping on a band saw is one thing. If you want clean, accurate cuts, you’ll need to take a little more care. Here’s how.
1. Use a Sharp Blade
Your blade must be sharp. A dull blade will drift and make it difficult to rip a straight line. It doesn’t have to be brand-new, but if you can’t get a straight cut, it’s probably dull.
2. Choose the Right Blade Width
Wider blades are better suited for rip cuts—like a rudder on a boat, a wide blade helps steer itself straight. You can rip with a narrow blade, but a ½" or wider blade will yield better results.
3. Consider Tooth Count (TPI)
Fewer teeth per inch (TPI) means larger gullets, which clear sawdust more efficiently. This lets you cut faster and keeps your blade cooler.
However, fewer teeth also mean rougher cuts—so there’s always a trade-off.
A 6 TPI blade is a good general-purpose choice for most work. Four TPI is better for ripping, but swapping blades just for a few rips isn’t always practical. I’ve found I can rip hardwood up to 1" thick and softwood up to about 1½" with a ¼" 6 TPI blade as long as I take it slow.
For heavier ripping, my second band saw has a ½" wide, 3 TPI blade—perfect for thick hardwoods.
Setting Up Your Saw
Setup matters even more than the blade itself.
Blade tracking: The blade should run down the center of the wheels.
Tension: Follow your saw’s recommendations.
Guides: Set them as close to the blade as possible without rubbing.
Table: Make sure it’s level so your cuts stay square.
Guide height: Lower it so it’s just above the workpiece.
Outfeed support: Essential for longer boards.
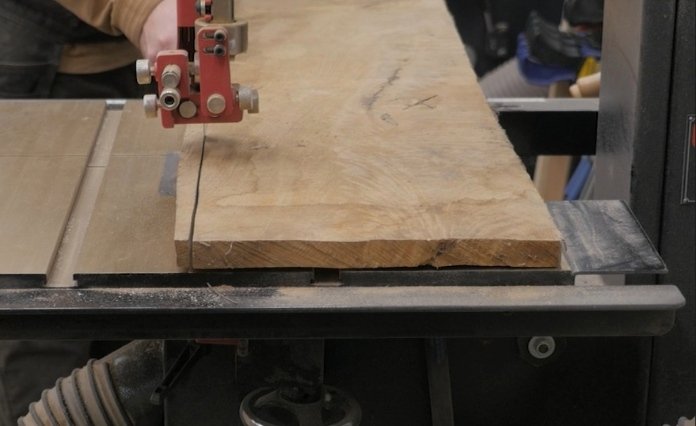
Fence vs. Freehand Ripping
You can rip freehand with some practice. But for better accuracy and repeatability, use a rip fence.
If your saw doesn’t have one, you can buy an aftermarket version or make one from wood. Set your fence parallel to the blade.
Some woodworkers adjust the fence to account for blade drift—but if your blade is sharp and your saw is properly tuned, it shouldn’t drift. If it does, you can adjust the fence quickly:
Draw a straight line parallel to the board’s edge.
Freehand cut along the line.
If you notice drift, stop halfway, turn off the saw, and let the blade stop.
Clamp the board in place exactly as it sits, then adjust your fence to match that angle.
Now your fence will be aligned with the blade’s natural cutting path.
Cutting Technique
Feed speed and consistency are key. Don’t overwork the blade—let it do the cutting. If you push too fast, the teeth will clog with sawdust and cause drift. The thicker the material and the higher the TPI, the slower you’ll need to go.
Avoid stopping and starting during the cut; this leaves visible blade marks. You can remove minor marks with a quick pass over the jointer or a few strokes with a hand plane.
If you’re ripping multiple strips:
Joint after each cut so you have a smooth edge for the next pass.
Or rip slightly oversized strips and run them all through the planer for consistent widths.
When cutting freehand, focus on your line and make small corrections. When using a fence, keep the board snug against it the whole time.
And always use a push stick—especially near the end of the cut—to keep your fingers clear of the blade.
Final Thoughts
My band saws will never replace my table saw for all ripping tasks, but they’re invaluable for certain cuts. They’re safer with rough or warped stock, great for minimizing waste, and surprisingly accurate with the right setup.
Follow these tips, and you’ll be making clean, safe, and efficient rip cuts on your band saw in no time.
This post may contain affiliate links. If you make a purchase, we may receive a small commission.
Need some cool tools for your shop? Browse my Amazon Storefront for inspiration.