
HOW TO SAFELY AGE HINGES AND HARDWARE
Cheap hardware-store hinges can look and function like premium hardware with a few simple fixes and aging techniques. This guide shows how to tighten loose barrels and apply three different patina methods—from natural aging to fast chemical finishes—for a custom, vintage look.
Good quality, furniture-grade hinges aren’t cheap. When you factor in the cost of materials and labor for a project, spending ten or twenty bucks per hinge isn’t a bad investment. But what if you need forty or fifty hinges? You may be tempted to grab the cheap ones from the hardware store.
In this article, I’ll walk you through how to make those inexpensive hinges look and perform much better. We’ll start with a quick tune-up, and then I’ll walk you through three different methods for turning that shiny hardware-store zinc finish into a nicely aged patina.
Step 1: Fixing the Loose Barrels
The biggest issue with cheap hinges? Loose barrels. This can vary from hinge to hinge. For example, I find that larger 2-1/2-inch hinges are stiffer than the 2-inch ones—at least that’s the case with the ones I bought at Home Depot. Maybe it’s because the larger hinge has two pins while the smaller has only one. I don’t know, but both have some slop—and the smaller one is definitely worse.
If a hinge is too loose, it’ll be impossible to properly align a cabinet door. So, they must be tightened up.
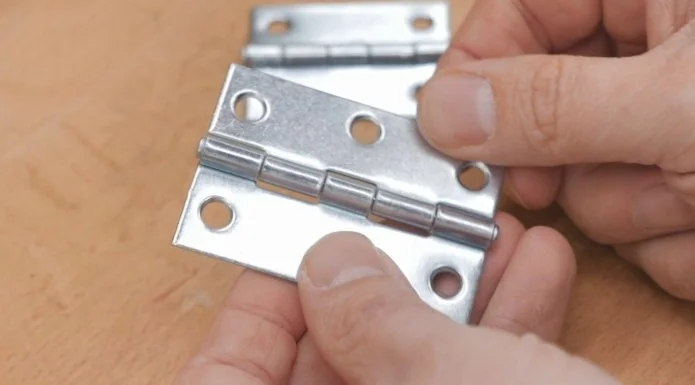
Start by pulling the pin with a pair of pliers. Then, grab a small hammer and a hard surface.
Your goal is to tap each segment of the barrel to close its gap. Start with relatively light taps, working your way down both leaves of the hinge. Then reassemble and test. If it’s still loose, pull the pin and tap some more.
Because I also want to add a bit of age to the hinge, I like to use the ball face of the hammer. If you want fewer marks, use the flat face instead.
You’ll quickly get a feel for how much tapping is required. I like mine just stiff enough that folding it with fingers takes a bit of effort—once mounted, the door acts as a lever and makes even a stiff hinge feel looser.
Step 2: Removing the Shiny Zinc Finish
Now let’s deal with that shiny zinc finish.
There are several ways to remove the sheen and even add a bit of rust, if that’s your goal. Many methods involve caustic chemicals and acids, but I’m going to share with you two natural approaches, followed by a third, super-fast chemical method.
First, start by degreasing the hardware. I use denatured alcohol, but soap and water will work fine. Don’t forget to clean the screws too.
Method 1: Citric Acid
Citric acid is a food-safe product available at grocery stores or online. It's found in candy, drink mixes, and other recipes.
Just dump a couple of tablespoons into a cup, add enough water to cover the hardware, and then add a couple more tablespoons to be safe. Stir once or twice to help the powder dissolve. Then let it soak.
Method 2: Vinegar and Salt
This mix uses basic table salt and white vinegar. Add a few tablespoons of salt and enough vinegar to cover the hardware. That’s it.
Method 3: Gun Blue (Fastest Results)
Gun blue is available anywhere gun supplies are sold or online. It’s a little caustic, so wear gloves.
I don’t recommend dipping the hardware directly into the bottle. Once the chemical reacts with metal, it loses potency. So, pour only what you need into a separate container. It doesn’t take much to do hinges and screws
Apply it liberally using an acid brush. Don’t worry about evenness—we’re aiming for a natural patina. Just make sure all shiny spots are covered.
Even if your brush is still wet, it becomes less effective after touching metal. That’s the chemical getting used up. This is why I avoid double-dipping into the original bottle—it can prematurely spoil the whole batch.
For screws, just coat the heads thoroughly, making sure the chemical gets into the grooves. If I wanted a more vintage look, I’d use slotted screws, but the regular screws often work fine.
Once everything is coated, rinse off with water. You can apply a second coat for a darker or more even finish, but I prefer the mottled appearance from a single coat.
Step 3: Aging with Rust (Optional)
Let’s come back to our other two soaking methods. You should see small bubbles coming off the hardware. If not, add more acid powder.
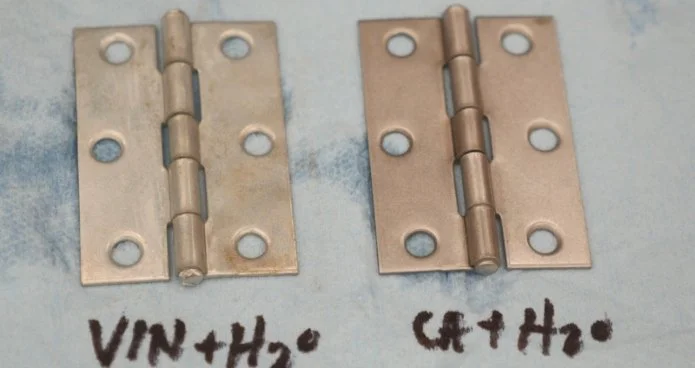
I left the hinges in for about an hour. Both lost their shiny zinc luster and have a matte finish. The citric acid-soaked hinge appears slightly duller than the vinegar-soaked one, but both are ready for further aging.
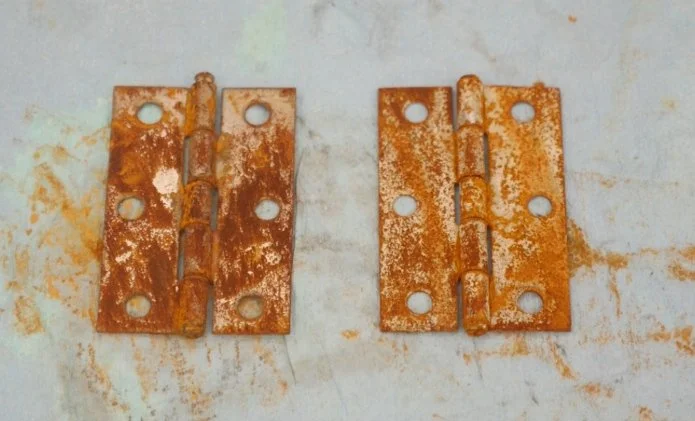
Now I add salt to a cup, toss in both hinges, and cover them with hydrogen peroxide. Give it a mix. You’ll quickly see the surface start to agitate.
After five minutes, rust begins to form—especially on the citric acid hinge. That solution clearly removed more zinc, leaving more exposed metal. After an hour, both hinges show significant surface rust.
I’m not going for the “forgotten-in-a-coffee-can” look. I refine the rust with light machine oil and a wire brush. How much you brush will determine how much rust is left. I typically aim for a stained, corroded look—not fully brown and crusty.
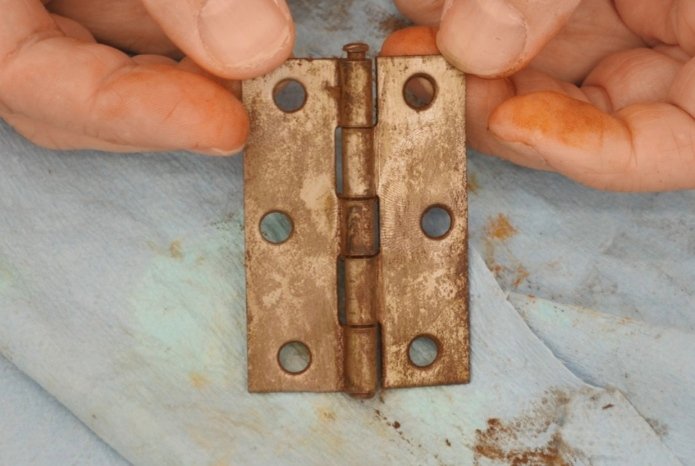
If you prefer a more fully rusted look, spray on a clear finish to lock it in and prevent it from rubbing off.
Just for fun, I also soaked one of the gun-blued hinges in the salt and peroxide. After just 15 minutes, it was heavily rusted—clearly, that finish leaves little protection.
Final Thoughts: Which Method to Use?
For a soft matte finish with light aging:
Citric acid is slightly faster than vinegar and salt, but both work well.For a dark, mottled appearance:
Gun blue is fast and effective.For a rusted, aged look:
The peroxide and salt soak is very effective. How long it takes depends on how well the zinc was stripped. The gun-blued hinge rusted quickly; the ones soaked in citric or vinegar took about an hour.To preserve rust:
Use a clear coat spray.To tone down rust and add character:
Use a wire brush and light oil.
These processes work on any zinc-coated hardware—hinges, brackets, pulls, nuts, bolts—anything you want to make look less shiny and modern.
This post may contain affiliate links. If you make a purchase, we may receive a small commission.
Need some cool tools for your shop? Browse my Amazon Storefront for inspiration.