
HOW TO MAKE RAISED PANELS WITHOUT EXPENSIVE TOOLS
You don’t need a pricey panel bit or a complicated setup to make beautiful raised panels. With a straight router bit and a simple jig you can build in minutes, you’ll get perfect results—fast, safe, and repeatable.
Raised panels are a fundamental part of cabinets and furniture. If you're into woodworking, you'll eventually need to make them—and when you do, you’ll be bombarded with videos and articles that demonstrate all sorts of methods using tools you probably don’t have, like a table saw dado set or a powerful router that can run a large, expensive raised panel bit.
But today, I’m going to walk you through how to make raised panels quickly, easily, and safely with just a regular straight router bit.
This method saves you from standing the panel on its edge or tipping it to impossible angles. Instead, the panel is kept flat and secure as it’s cut with a simple, homemade jig I built in just a few minutes from some plywood scraps. I even made plans so you can make the jig yourself.
Understanding Raised Panel Construction

First, you need to know a little bit about how raised panels are constructed. The panel sits in a groove in the frame around it. Since the frame is typically 3/4 inch thick, the raised panel would protrude far beyond the frame if it were also 3/4 inch thick.
The common solution is to use 9/16 inch thick stock for the panel—or to cut a rabbet around the back of the panel so it can sit back inside the frame.
For this jig to work properly, you need to choose one of those two options. For me, the simplest option is to cut a rabbet that reduces the thickness of the panel around its edges to 9/16 inch. Here's how I do that:
Setting the Bit Height
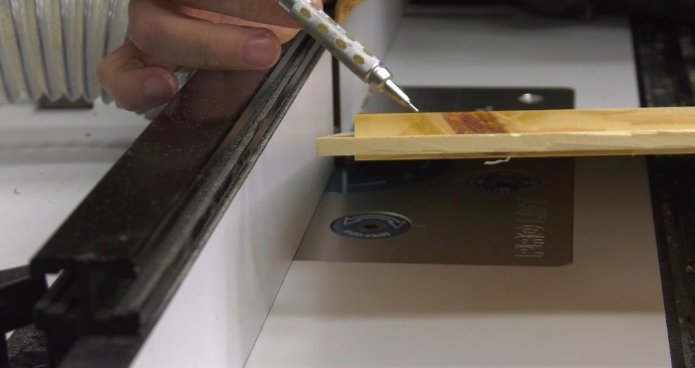
First, you need to know how thick your panel actually is, because it may not be exactly 3/4 inch. A digital caliper is a great way to get an accurate measurement, and sure enough, my test stock measured a bit less than 3/4—0.647 inches.
I wanted to reduce that to 9/16 inch, which according to the scale on the back of my caliper is 0.562. Subtract 0.562 from 0.647 and I got 0.085. That’s how much I needed to remove from the panel’s thickness, so that’s the height to which I set my straight router bit.
This jig is also designed to leave a 1/2 inch wide tongue around the edge of the panel to fit in the grooves of the frame, so I set my fence to expose just 1/2 inch of the bit and I’m ready to back-cut my panel.
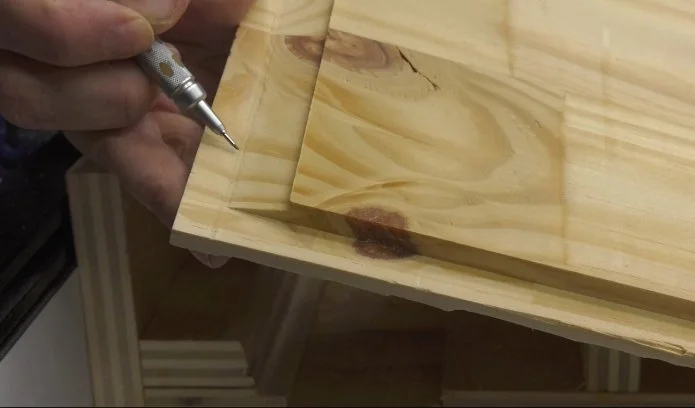
I always cut the end grain first, where tear-out is most likely to occur. Then I can clean up that tear-out when I make the rest of my cuts along the grain.
Creating the Tongue
These rabbets created the back cut I needed to reduce the panel's thickness to 9/16 inch around the edges. But the tongue itself, which will fit inside the grooves in the frame, has to be further reduced to 1/4 inch thick.
So, I need to take some material off the front of the panel as well.
9/16 inch minus 1/4 inch equals 5/16 inch, or 0.312.
I set my bit to that new height without moving the fence, and then I cut another set of rabbets—this time on the front of the panel—creating a 1/4 inch thick tongue all the way around.
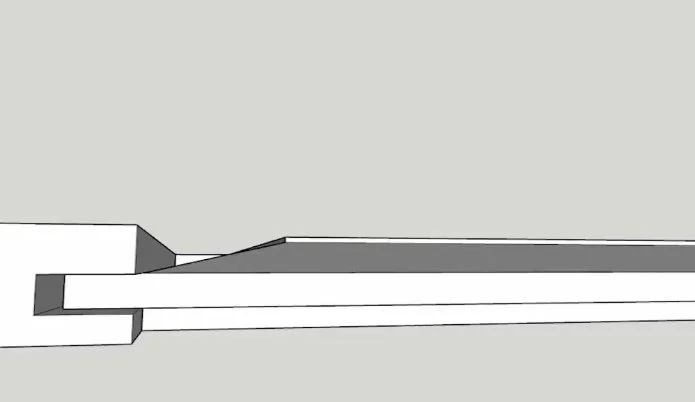
Creating the Bevel
What remains is a thick raised center—or a raised panel. But to make it more attractive, we have to bevel the edges of the raised center. And we can do that with the same straight router bit and our new jig.
I install my jig against the fence so the router bit just barely brushes against the rim of the hole in the center. I don’t want it to cut into the jig—I just want it as close as possible.
I lay the panel on top of the jig with the front side downward, and now I have to use some trial and error to set the bit height. I want the corner of the bit to just scrape against the tongue on the edge of the panel.
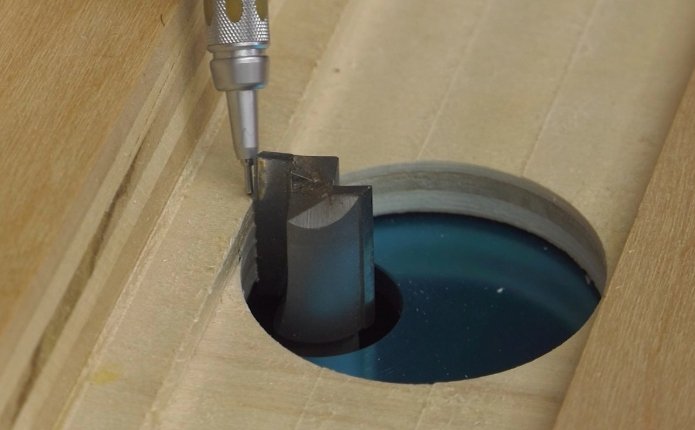
Unfortunately, the adjustment mechanism for my lift is beneath the jig, so I have to keep moving the jig out of the way to change the bit’s height. I considered cutting another hole in the jig’s base so I could access the lift control through it, but once I got it dialed in, I just measured the bit’s final height and wrote it down for next time.
Making the Bevel Cuts

With the bit height set, I clamp the jig to the fence and put a little wax on the parts of the jig that the panel slides against for smoother operation. Then I make my first cut, being sure to keep the panel flat on top of the jig as I pass it over the bit.
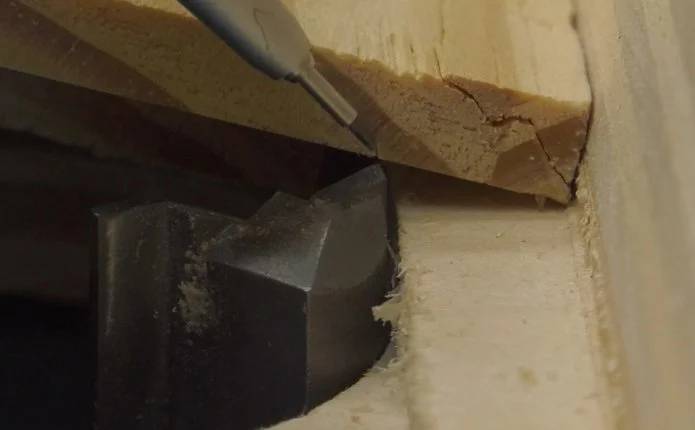
If you end up with a little shelf on the edge of the bevel, you need to raise your bit slightly. A properly set bit should create a bevel that meets the tongue as perfectly as possible. Mine left a very shallow line on the tongue—that's likely to sand away easily, so I’m not worried about it. If it were any deeper, I’d lower the router bit just a touch to get a smooth transition.
As you cut the bevels around the perimeter of the panel, remember to do the end grain first, then the long grain to clean up any tear-out.
If you have several raised panels to make, do them all now before adjusting the jig to widen the bevel with a second pass.
Widening the Bevel
Yes—depending on the width of your router bit, one pass will not be enough. Move your router table fence and the attached jig away from the bit, and take another pass all the way around the panel to widen the bevel.
As you do, the center of the panel will stand above the bevel a bit less. I like a rise of about 1/16 inch in the center. Once that’s dialed in, finish up all the raised panels in your project before putting your jig away.
Final Touches
If your router bit was sharp, there should be little to no tear-out. But a little sanding may be required to crisp up the edges on the end grain.
I typically use a carbide sanding block, but some adhesive-backed sandpaper on a wood scrap will work too. In fact, you can make a custom block that’s exactly as wide as the bevel for sanding those surfaces smooth as well.
Save Your Settings!
I know I threw a lot of numbers at you in this article, but it’s not complicated at all. Those same settings apply every time you use the jig, no matter what size the raised panel is.
So why not write them on the bottom of the jig itself where they’ll be handy for next time? I even laid out the measurements of the bevels and tongues as they will be on the completed panel—because this jig will always cut them the same, no matter the overall size of the panel.
By the way, my bit height for cutting the bevels ended up at 0.754 inches above the top of the router table—so that may save you most of that trial and error anyway.
Get the Plans
Don’t forget to check out the plans for this jig. It’s a really easy way to make a classic raised panel with a simple straight router bit.
Happy woodworking!
This post may contain affiliate links. If you make a purchase, we may receive a small commission.
Need some cool tools for your shop? Browse my Amazon Storefront for inspiration.