
MAKE BIG PROJECTS WITHOUT THE OVERWHELM
Big woodworking projects don’t have to be overwhelming—designing for efficiency turns chaos into a smooth, repeatable process. By standardizing parts and batching joinery, you can build an entire room of furniture faster, with fewer mistakes and dramatically fewer machine setups.
Most woodworkers eventually consider taking on a large project. I don’t mean a big piece of furniture like a bed. I mean a kitchen full of cabinets, an entire dining set, or a room full of furniture.
That can feel intimidating. Even if you’ve successfully built a cabinet or an end table, a kitchen with twenty cabinets—or a full living room set with two end tables, a coffee table, and a television stand—feels different. Maybe overwhelming.
But it doesn’t have to be.
There are things you can do to make large projects much easier and a great deal faster to build.
Designing for Efficiency
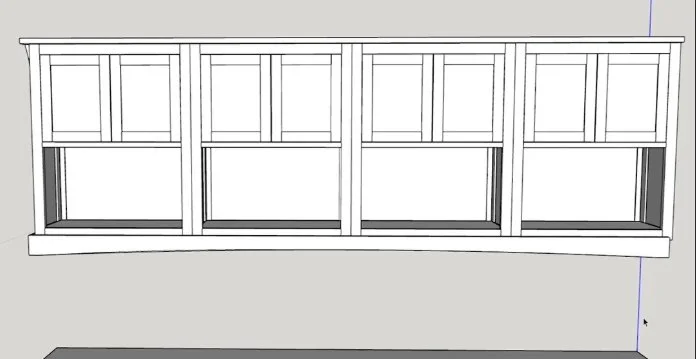
Awhile back we worked on a large furniture project for the office here in the workshop. It includes eleven pieces in five different forms. It was built in an early 20th-century Craftsman style with frame-and-panel construction, which means there are hundreds of individual parts. It would be easy to feel overwhelmed.
Click to enlarge. Part of the furniture project for the office.
But we structured the project for efficiency—from the design phase through the entire build process.
There are several lessons here that may help you with your next large project, whether it’s a set of kitchen cabinets or a seven-piece dining set. For this article, we’ll focus on how design alone can greatly affect the speed and efficiency of a build.
I’m not just talking about finishing sooner—not everyone is facing a deadline. An efficient process reduces mistakes, saving you frustration, wasted material, and money.
Factory-built furniture is designed with efficiency in mind. Everything—from part sizes to joinery—is standardized to reduce machine setups and allow multiple identical parts to be batched out at once. These same principles can be applied in your own workshop, starting with the design itself.
I designed this furniture to be functional and attractive, but I also designed it with the build process in mind.
Standardizing the Project
It’s not really eleven individual pieces. They’re standardized into five types:
Four identical wall cabinets
Three identical base cabinets
Two identical tables
One desk
One file cabinet
These five types are further standardized by construction method. Everything is based on simple frame-and-panel joinery.
Click to enlarge.
Each panel consists of two rails, two stiles, and a center panel. While one panel may be large (like the back of a cabinet) and another small (like a door), they’re basically the same in many ways.
Each frame has two horizontal rails and two vertical stiles. All of these rails and stiles—no matter where they appear in the project—are 1-1/2 inches wide. Most also share the same 1/4-inch groove on one edge. And all the rails have 1/4-inch tenons on the ends.
Yes, the overall lengths vary. But set that aside for a moment and focus on what’s the same. What can be batched out with a single tool setup?
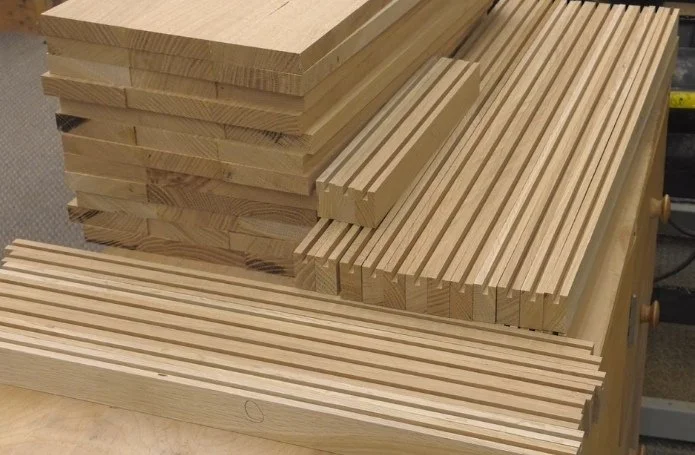
Batching Parts for Speed

We knew all the stiles and rails are the same thickness, so we milled a batch of white oak to 3/4 inch thick.
We also knew they’re all the same width, so we ripped a pile of 1-1/2-inch-wide strips.
Lengths do vary, but they fall into clear groups. For example:
All stiles on the back panels, side panels, and face frames are 29 inches long (eight per cabinet, thirty-two total for four cabinets).
Upper and lower rails on back panels and face frames are all 29-3/4 inches long (sixteen total).
Sixteen rails are 6 inches long for side panels.
Sixteen rails are 8-1/2 inches long for doors.
Sixteen door stiles are 12-7/8 inches long.
So all the rails and stiles can be divided into five groups of identical parts. Each group is cut using a stop block to ensure consistent length. That takes maybe five or ten minutes per group, and then we move on to joinery.
Standardized Joinery
Joinery is standardized too.
All back panels, side panels, and doors receive the same groove down the edges of both rails and stiles. That’s done with one table saw setup, regardless of piece length.
Next, every horizontal rail gets tenons on both ends—again using a single setup, whether it’s a short door rail or a long back rail.
By keeping joinery consistent, the project becomes much simpler. You’re not cutting thirty-two door tenons and sixteen back panel tenons. You’re cutting ninety-six identical tenons with one setup.
Click to enlarge.
Of course, there are exceptions. The backs and sides get center panels, but face frames do not. That means the front stiles can’t have full-length grooves. Those eight pieces were set aside and given stopped grooves at the router table, again using stop blocks for consistency.
That added one extra step, but overall a very complex project required surprisingly few machine setups.
All-in—including milling thickness, ripping strips, cutting lengths, plowing grooves, cutting stopped grooves, and forming tenons—we used just ten machine setups.
Add fence adjustments for square panels and two solid wood shelves, and the total comes to nineteen setups for a wall of cabinets.
Only 19 machine setups were required to complete a whole wall of cabinets.
How many times do you usually move your fence or change blade height on a single project? Probably more than nineteen.
Thinking Like a Small Factory
Here’s where it gets interesting.
The base cabinets, file cabinet, tables, and desk all use the same frame-and-panel construction. The entire project is built from rails and stiles of the same width and thickness, with the same grooves and the same tenons.
Instead of batching ninety-six tenons for one part of the project, you could batch all tenons for the entire room with a single setup. Same goes for full-length grooves and stopped grooves.
With proper planning, your shop can become a small-scale production factory.
You’re no longer making twelve separate pieces of furniture. You’re making ten of one part, twenty of another, thirty of another—parts that assemble into panels, then into five different furniture forms.
Using this approach, an entire room of furniture with hundreds of components can be built with a surprisingly small number of machine setups—greatly reducing mistakes and dramatically speeding up the process.
Applying This to Your Own Projects
Try to standardize your designs so you can batch identical or similar parts.
Even if you’re not designing the project yourself, you may still be able to tweak things—like making all tenons the same thickness.
Look for common traits among parts. Remember how I cut all stiles and rails to width first because that was something they all shared. Then I grouped them by length. Then by joinery.
There are many other ways to make large projects run more smoothly. We’ll cover more of those in the future.
Happy woodworking!
This post may contain affiliate links. If you make a purchase, we may receive a small commission.
Need some cool tools for your shop? Browse my Amazon Storefront for inspiration.