
FREEHAND SHARPENING: HOW TO DEVELOP CONTROL WITHOUT A JIG
Freehand sharpening isn’t about ditching precision—it’s about building control so sharpening becomes fast, automatic, and friction-free. Once you can reliably find and hold the bevel by feel, maintaining sharp tools turns into a quick habit instead of a chore.
I’ve found over the years that the best sharpening method isn’t the most precise system—it’s the one you’ll actually use consistently in your shop.
In practice, that almost always means the fastest and simplest method wins.
Recently, we looked at ways to speed up hand sharpening by stropping more often and simplifying your grit progression. We also covered how to set up a honing jig so it’s fast enough that you don’t avoid using it.
Both approaches are useful.
But at some point, it’s worth learning to remove the jig entirely.
That’s what this is about.
Why Freehand Sharpening Matters
Freehand sharpening intimidates a lot of people at first, and that’s understandable. A jig feels controlled. Predictable. Repeatable.
But in real-world use, I’ve found the opposite is often true:
Once freehand sharpening becomes comfortable, it’s actually faster, simpler, and more consistent in day-to-day work—because there’s nothing to set up.
You walk over to the stone, sharpen the edge, and get back to work.
That speed matters. Because the faster sharpening is, the more likely you are to maintain your tools properly instead of postponing it.
And dull tools are almost always the real problem in woodworking—not sharpening itself.
Finding the Angle
For this, I used a 1000-grit diamond stone, but the process is the same on:
water stones
oil stones
sandpaper systems
The first step is simple, but it’s the most important.
You need to find the bevel on the stone.
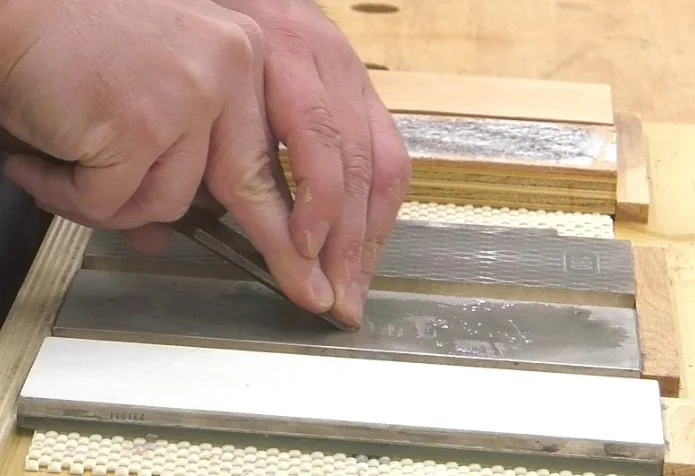
Place the tool down and slowly rock it until the bevel sits flat. When it’s correct, you’ll feel it settle—there’s a noticeable “full contact” point.
That position is your reference.
From there, the entire process is about maintaining it.
That sounds straightforward, but in practice, it takes a bit of control to keep that angle consistent while moving.
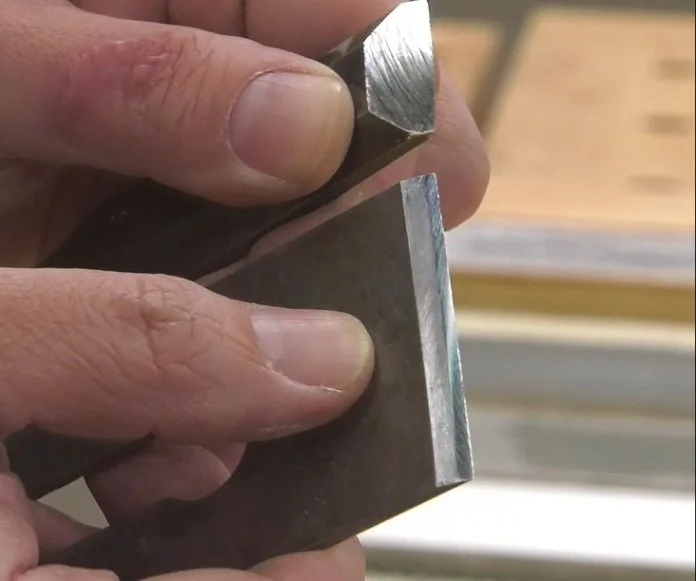
Why Chisels Are the Best Starting Point
In my experience, chisels are the best tools to learn freehand sharpening on.
The reason is simple: the bevel is wider, which makes it easier to feel what the tool is doing on the stone.
With a chisel, you can clearly sense:
when the bevel is flat
when you’ve tipped forward
when you’ve lifted off the edge
That feedback is what you’re learning to recognize.
Plane irons are less forgiving because the bevel is narrower and harder to interpret by feel alone.
The First Real Challenge: Moving Across the Stone
Once you can find the angle, the next challenge is maintaining it while moving.
This is where many people struggle.
If you stay in one spot, it feels easy—but that’s not realistic and is bad for the stone. You need to use the full stone surface.
When people first start doing this, the usual problem is inconsistency:
wrists loosen
pressure shifts
the tool rocks slightly
and the angle changes without them noticing
That’s normal.
It just means the control needs to come from a different place.
Your Body Becomes the Jig
When you remove the jig, you’re not removing control—you’re relocating it.
In this case, your body becomes the stabilizer.
Once you’ve found the bevel:
Lock your wrists.
Do not actively adjust them during the stroke.
Instead, control the movement through your:
elbows
shoulders
Start slowly and deliberately. The goal at this stage is not speed—it’s maintaining continuous contact with the stone while moving.
If you try to rush this step, you lose the feedback you’re trying to learn from.
Finding a Motion That’s Consistent
There isn’t a single correct motion for freehand sharpening. What matters is repeatability.
Over time, I’ve seen a few stable approaches:
Some people work straight forward and back, keeping the tool centered in front of them.
Others rotate slightly and work more with one arm.
If neither feels stable, a more controlled approach is to:
lock the wrists
lock the elbows
and move from the shoulders or body instead
Foot position can also help. Standing with one foot slightly forward allows a natural rocking motion that keeps pressure consistent through the stroke.
Even working height matters. Some people are most stable at waist height, others slightly higher or lower depending on how they naturally engage their shoulders.
There’s no universal setup here. What matters is consistency—not form.
Control First, Speed Later
At this stage, speed is not the goal.
What matters is:
maintaining the bevel
keeping steady contact
and covering the stone evenly
Once that becomes stable, speed develops naturally.
In practice, most sharpening problems come from trying to go fast before the motion is controlled.
Hand Position Matters More Than People Expect
Grip plays a larger role than most people realize.
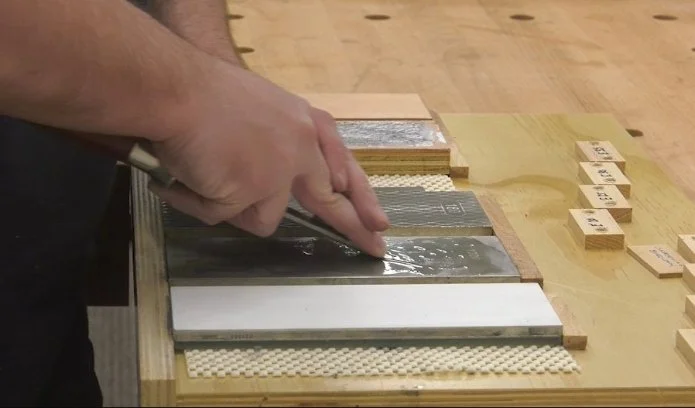
I keep my fingertips close to the cutting edge, near the stone itself.
This gives direct feedback and better control over small angle changes.
If your hands are too high on the tool, small movements are amplified and the bevel becomes harder to control.
I maintain a firm grip overall, but I avoid pressing down with the heel of the hand. Most of the control should come from fingertip pressure near the cutting edge.
Practice Is What Builds Consistency
Freehand sharpening is not a one-time skill—you build it through repetition.
In practice, I’ve found the most reliable approach is simple:
Sharpen regularly, even if it’s just one tool at a time.
A good progression is:
one chisel per day at first
then gradually increasing speed as control improves
then moving on to plane irons
By the time you’ve worked through a small set of tools, the motion becomes automatic enough that sharpening stops feeling like a separate task.
It becomes part of normal workflow.
Sharpening Plane Irons (What Changes)
Plane irons introduce a different level of difficulty.
The bevel is narrower, and on thinner irons—especially older Stanley-style blades—it’s harder to feel when you’re fully seated on the stone.
This is where technique matters more.
Tip 1: Hollow Grinding
When significant reshaping is needed—chips, wear, or major bevel correction—a bench grinder is often the most efficient approach.
Beyond speed, hollow grinding creates two points of contact on the stone.
That makes it easier to register the bevel consistently by feel.
It’s not required, but it does make freehand control easier in practice.
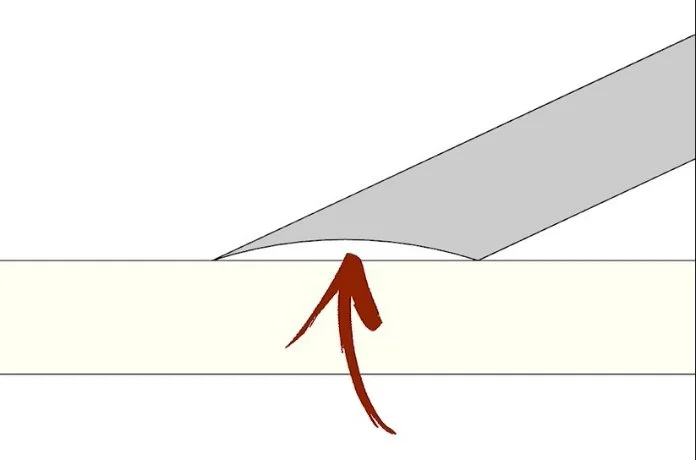
Tip 2: Slight Upward Tilt for Forgiveness
Another technique I use is a small intentional adjustment.
After finding the flat bevel, I’ll raise the tool slightly—just a few degrees.
This does two things:
keeps the cutting edge engaged even if the angle drifts slightly
reduces the number of strokes needed for touch-ups
It’s a practical adjustment, especially for maintenance sharpening.
The Tradeoff
That technique naturally creates a micro-bevel.
Over time, that micro-bevel will:
widen
change geometry slightly
and eventually require a full regrind
That’s expected.
For routine sharpening, however, it’s an efficient and controlled approach.
Why This Skill Is Worth Developing
Freehand sharpening is not about replacing jigs—it’s about flexibility.
When it’s working properly, it’s:
fast enough to do frequently
simple enough to avoid friction
and consistent enough to trust
And that combination is what keeps tools sharp in real shops.
Because in practice, the goal isn’t perfect edges.
It’s reliable edges that are easy to maintain.
Final Thought
If you take anything from this, it’s this:
Freehand sharpening is not about precision first—it’s about control first.
Once that control becomes stable, everything else becomes faster and easier.
And at that point, sharpening stops being a task you plan for—and becomes something you simply do when needed.
This post may contain affiliate links. If you make a purchase, we may receive a small commission.
Need some cool tools for your shop? Browse my Amazon Storefront for inspiration.